travelwith3bubs

Travel Tips, Family Friendly Holidays and Life in Hong Kong

Author: travelwith3bubs

  • 8 Essential Tips For A Great Day Out

    8 Essential Tips For A Great Day Out

    8 Essential Tips Riding the Central to Mid-Levels Escalator, Hong Kong

    Caine Rd escalator

    A busy tourist attraction in Hong Kong but so many visitors fail with the logistics. Let me give you a short introduction about the famous escalator followed by 8 essential tips no one tells you.

    The Central to Mid-Levels Escalator in Hong Kong is the longest outdoor covered escalator in the world. I will not bore you with measurements as they do not compute with me. All one needs to know is that it is not one super long escalator (that would be frightening!) but rather a transport system comprised of 18 escalators and 3 travelators. 

    The escalator system was built in 1993 to ease traffic congestion in the residential area known as the Mid-Levels. It takes commuters from Central to half way up the mountain and vice versa and it is used by thousands daily to get to work, school and go about their daily lives. 

    There have been many articles and vlogs about the Central to Mid-Levels escalator. But none of them seem to cover the most important details for tourists! Luckily I am here to assist 😄.

    Start of escalator - 8 essential tips

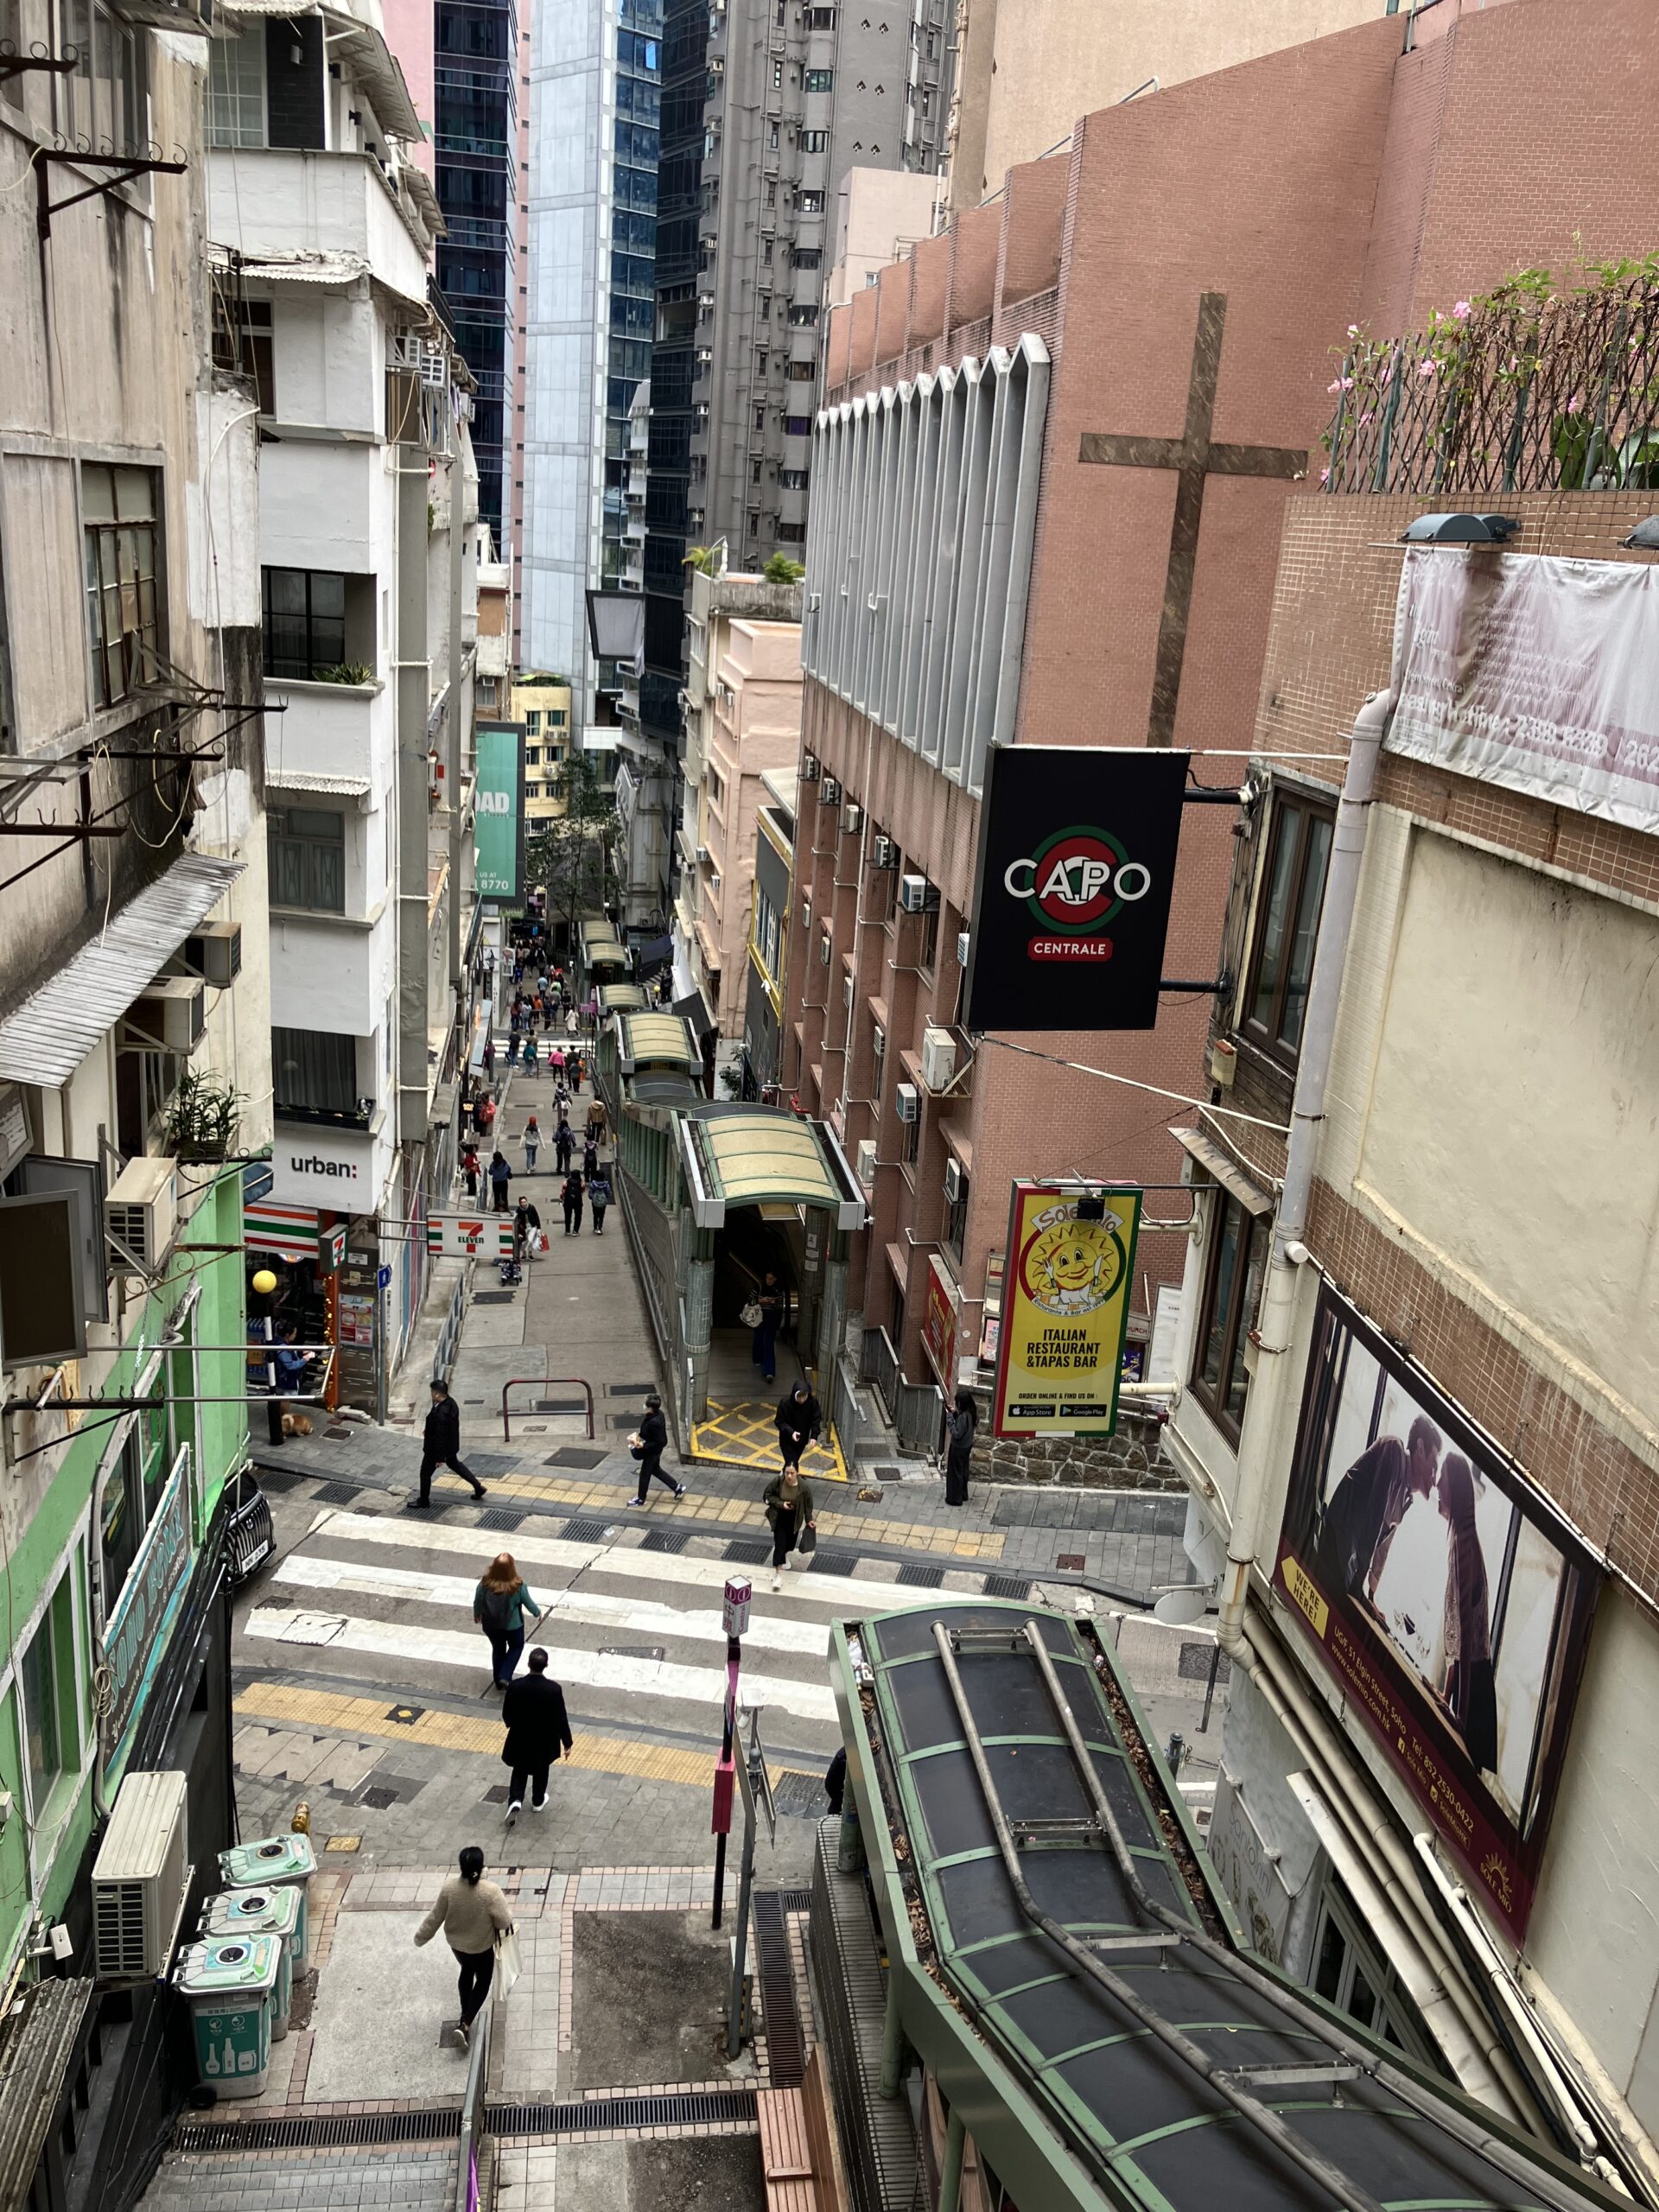
    Start of the Midlevels escalator in Central

    Tip 1 of the 8 Essential Tips

    The whole system only goes ONE WAY! It goes downwards from 6am to 10am for rush hour commuters. It then switches direction and goes upwards from 10am to midnight. 

    Tip 2 of the 8 Essential Tips

    Although it says 10am, this is when it starts switching over from the top of the escalator system. By the time they switch directions of all the escalators it will not be until around 10.20am that you can be sure the escalator is going up from the start in Central. DON’T GET THERE TOO EARLY. Otherwise you will either be standing around or have to walk up a few of the steep sections. 

    Tip 3 of the 8 Essential Tips

    Keep to the RIGHT HAND side of the travelators/escalators if you are stationary. If you want to walk, you can do so on the left hand side.  

    Tip 4 of the 8 Essential Tips

    There are famous noodle shops, dim sum restaurants and bubble tea cafes in the area. Feel free to exit the escalator system after the first travelator if you want a QUICK SNACK. 

    My favourite is wonton noodles and a plate of vegetables at Mak’s Noodles (77 Wellington St). There is also the famous roast goose at Yat Lok (34-38 Stanley St). You will also find a branch of One Dim Sum (44 Lyndhurst Terrace). For a more authentic experience though I’d recommend their Prince Edward restaurant. 

    Tip 5 of the 8 Essential Tips

    After the second set of travelators you will find TAI KWUN, the rejuvenated prison, police station and magistracy complex. Definitely leave the escalator system at this point to have a wander around and take some photos.

    There are also some al fresco bars and high end restaurants. My favourite bar here is Botanical Garden for a cheeky G&T. For an expensive but excellent Indian dining experience book a table at Prince and the Peacock for dinner. 

    Tip 6 of the 8 Essential Tips

    Rejoin the walkway to continue with the escalators. In this collection of escalators you will find all the tourists queuing mostly for bakery items. Head to Bakehouse for a delicious sourdough PORTUGUESE EGG TART. If the queue is too long then try a tiramisu danish at Vission which usually has smaller queues.

    There is so much to do in Hong Kong. I wouldn’t waste my time if all the queues are super long. It is just a pastry after all.   

    Vission bakery queue - Tip 6 of the 8 Essential tips
    Queue for Vission. Definitely not worth the wait if you have other things to do. 
    Bakehouse queue - Tip 6 of the 8 Essential tips
    Queue for Bakehouse.  Don’t bother if the queue is any longer than this.

    Tip 7 – Important!

    At this point between escalators you will need to cross some one way streets with pedestrian crossings. Very important – pedestrian crossings do not have the same kudos as those in some other countries. ie cars tend not to stop at pedestrian crossings in Hong Kong! LOOK IN THE DIRECTION OF THE LOLLIPOP POSTS AND CROSS WITH CAUTION. 

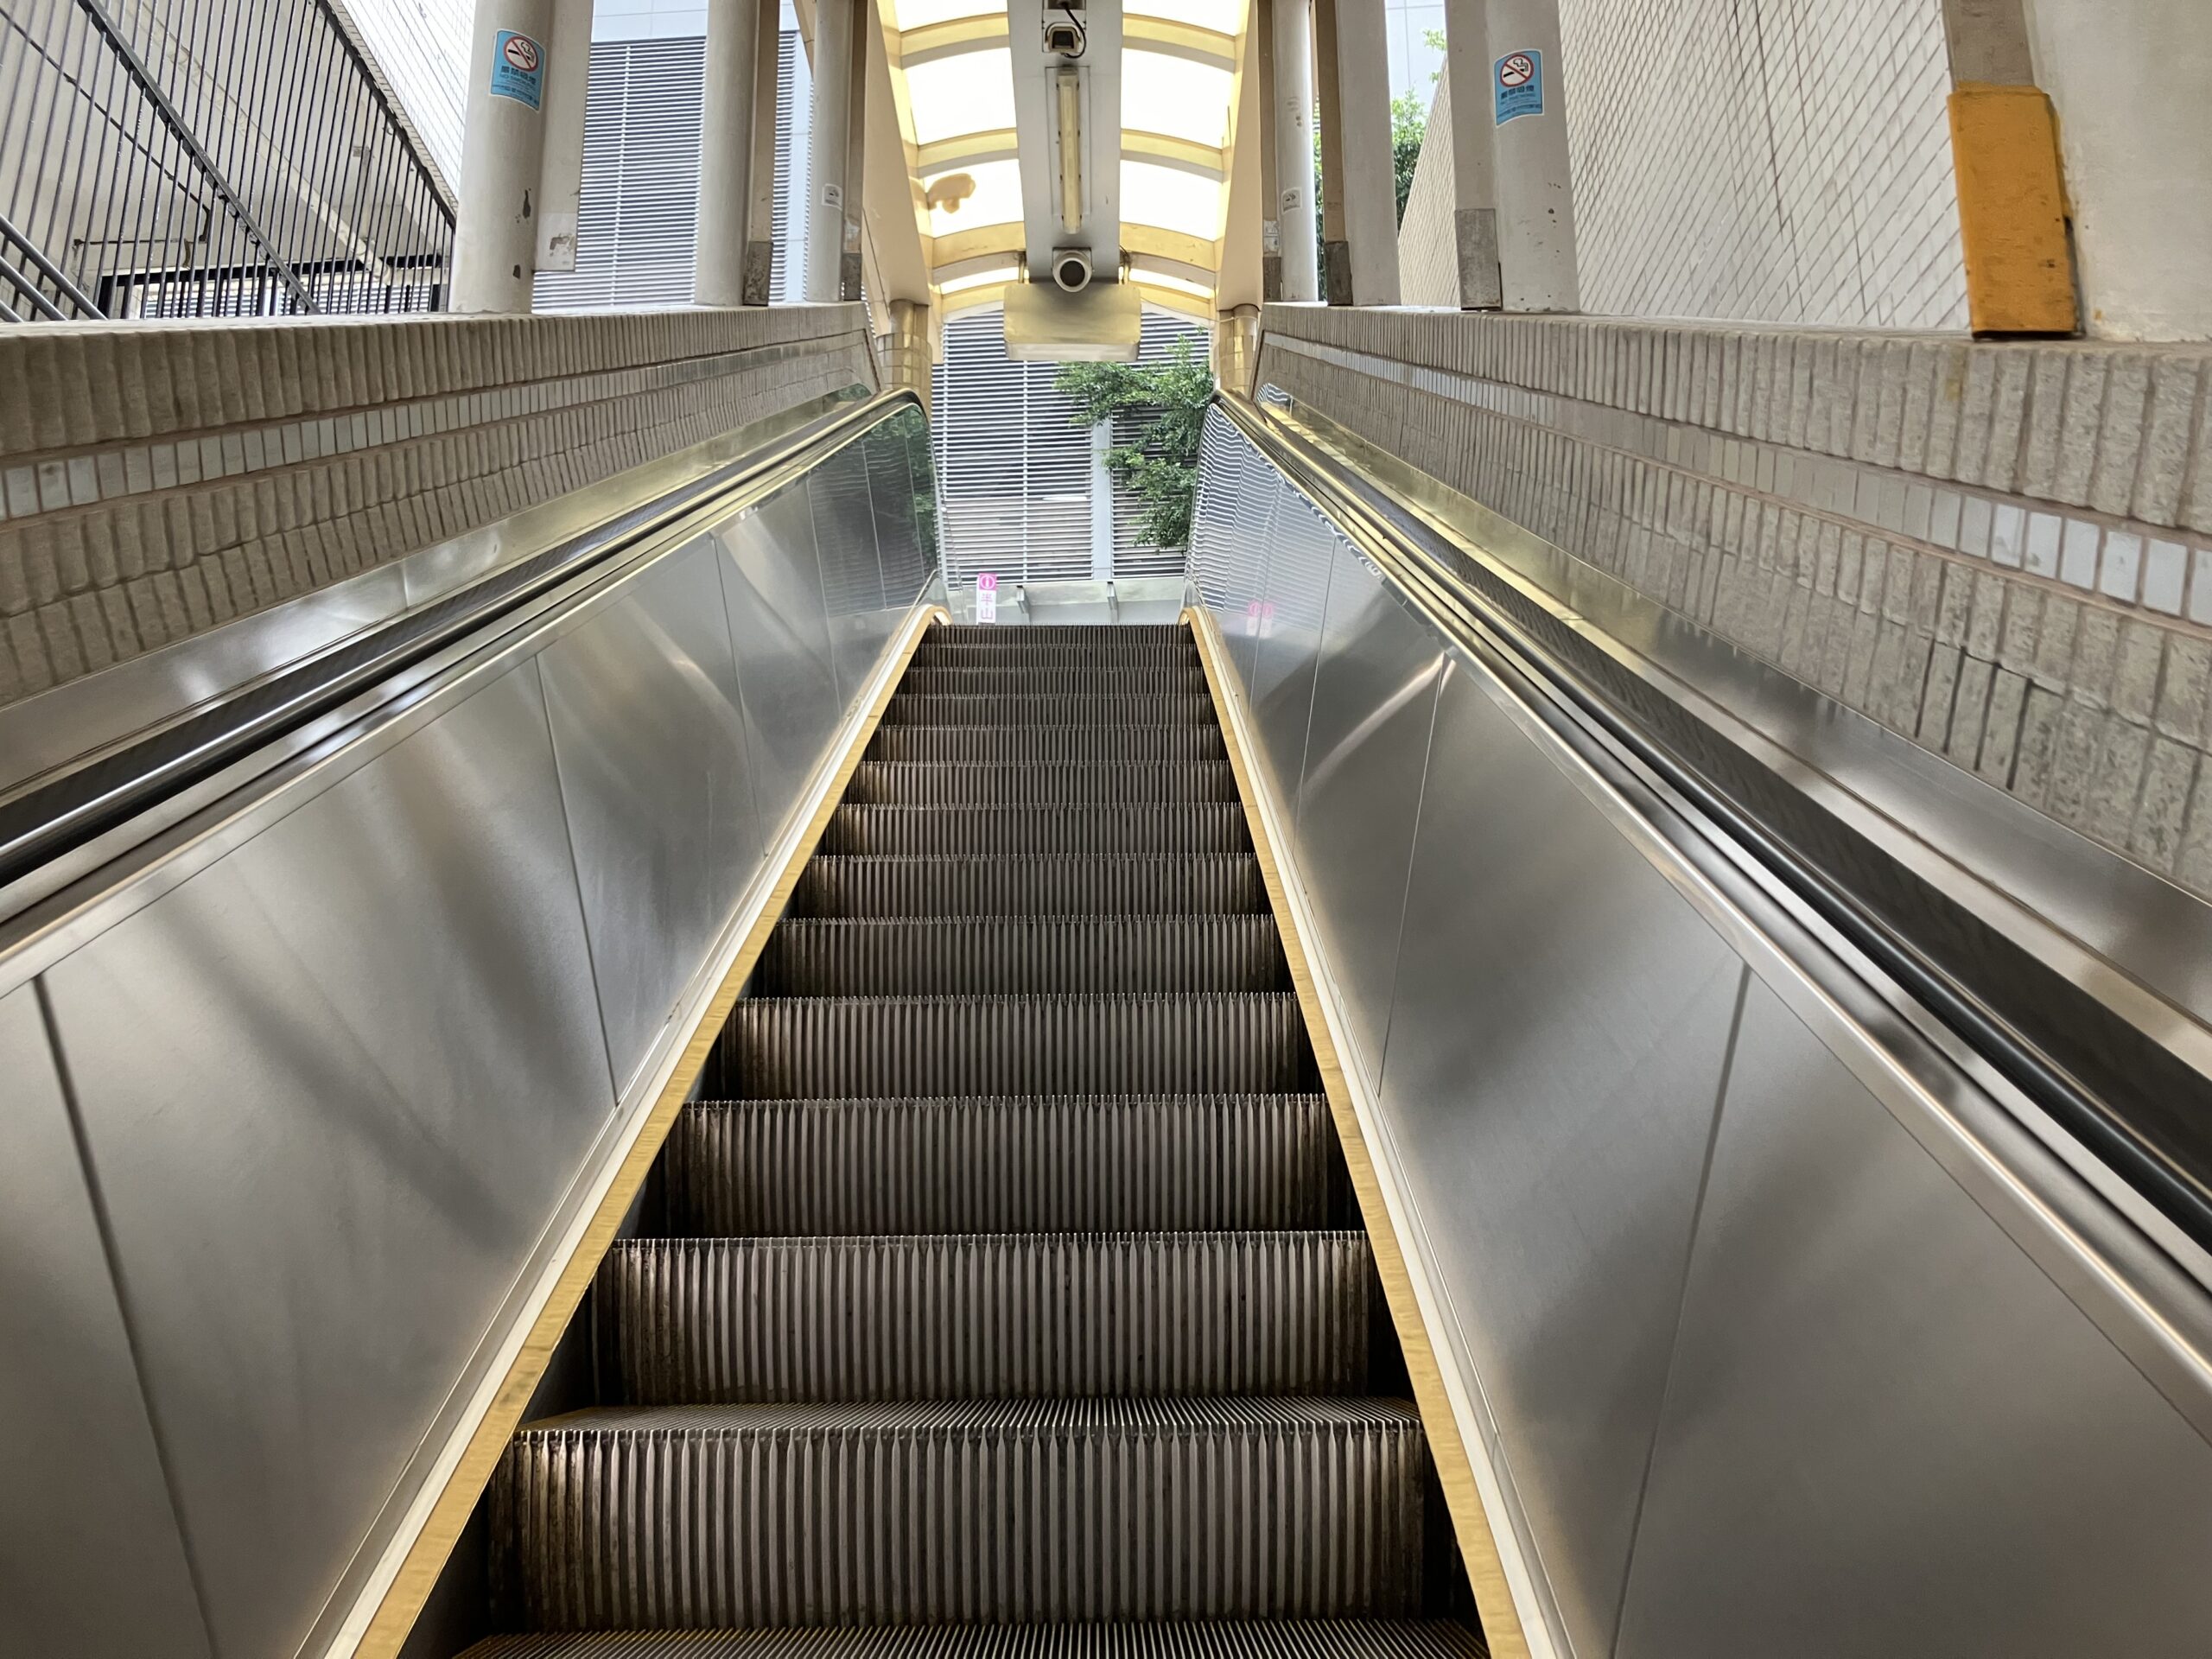
    Tip 8 – MOST IMPORTANT!

    Go up a couple more sets of escalators and when you get as far as Caine Rd then STOP! DO NOT GO FURTHER THAN THIS. You will be tempted to continue to the top but believe me, it gets more underwhelming. There are less shops and the higher you go the further you need to walk back down.

    At the Caine Rd escalator, stand at the landing to get a nice photo of the escalators below. You should then walk back down via the stairs.  Also take care and don’t look at your phone as the steps going down can be slippery. 

    Caine Rd escalator
    View from Caine Road escalator. There is no need to go further than this!

    So there you have the 8 essential tips that no one else will tell you. If you ignore my MOST IMPORTANT TIP, then head to 5 Practical Options at the Top of the Escalator. Here I explain what to do if you unfortunately find yourself at the top. 😉

    Thanks so much for reading. 

    Shareen

    Logo
  • At the Top of the Escalator – 5 Practical Options

    At the Top of the Escalator – 5 Practical Options

    If you ignored my advice in 8 Essential Tips For Riding the Mid-Levels Escalator you will now find yourself on Conduit Road.

    Click here if you would like to buy a t shirt to say you made it to the top of the escalator. You’d expect to at least find a shop at the top selling these, but no. There are zero shops here. 

    Conduit Rd
    Conduit Rd

    There are 5 options once you get to the top of the escalator. 

    Option 1 – walk back down from the top of the escalator

    Walk back down. There are stairs adjacent to all the escalators. Just take care as some areas can be slippery if wet. 

    Option 2 – catch a cab

    Take a taxi wherever you are heading next. You can just hail any taxi that drives past. It should cost around HK$40 to get back to Central. 

    3 minibus stop at top of escalator
    Taxi option or Number 3 Minibus stop

    Option 3 – catch a bus

    Take minibus number 3 back to Central. This is cheaper than a taxi but I don’t recommend it unless you are solo or the only ones waiting.

    The number 3 minibus is sometimes unreliable and by the time it gets to this stop it is often full. You need coins (no change given) or an octopus card. You can download the Citybus app to give you a better idea of real time schedule. You should always have an octopus card anyway. It makes life much easier with public transport in Hong Kong. You can also use it at convenience stores, coffee shops and many other places.

    Option 4 – This is a great option! Turn left at the top of the escalator.

    Walk to the Hong Kong Botanical and Zoological Gardens. It is an easy walk and can tick off another item on the sightseeing list. Google maps is not clear and many people go the wrong way.

    If you need to cross a busy road and there is no crossing then you have gone the wrong way! Here is the Google map which seems to confuse people. I also have a YouTube video showing the exact route. 

    Route to Botanical Gardens from the top of the escalator

    Option 5 – not for the unprepared! Head up the Peak from the top of the escalator.

    Walk up to the Peak! If you do not have a reasonable level of fitness don’t bother doing this. 

    There are two routes from the top of the escalator at Conduit Road. Via Old Peak Road (left) which is very steep and via Hatton Road (right) which is longer. I have included Google Maps showing both routes but again these are not clear and often lead you astray.

    You can also watch my YouTube videos showing the exact routes. Note there are no drink stops or shops on the way. 

    Top of the escalator - turn left
    Head this direction for Option 4 to HK Botanical Gardens or Option 5 to the Peak via Old Peak Road
    Route to the Peak via Old Peak rd

    Google Maps showing route to the Peak via Old Peak Road 

    Route to the Peak via Hatton Rd

    Google Maps showing route to the Peak via Hatton Road

    Top of the escalator on Conduit Rd - turn right
    Head this direction for Option 5 to the Peak via Hatton Rd

    If you do decide on Option 5 you will be rewarded by magic views at the top. But don’t say I didn’t warn you!

    Good luck and thanks for reading!

    Shareen

    View from the top

  • Carry On Challenge : It’s a Game Changer

    Carry On Challenge : It’s a Game Changer

    Carry On Challenge – 3 weeks,3 kids


    A couple of summers ago our family of five spent 3 weeks holidaying in Europe. A week on the Greek island of Kythera, followed by a week cruising and a week in Arezzo, Italy.  My one rule – all family members were only allowed to take carry on luggage!

    Surely one needs more than carry on you say?! The boys did not mind so much. Our 17 year old daughter needed more convincing


    Losing luggage in Europe during the height of summer seemed very high so I didn’t want to risk it. It was absolutely the right call. Had we not done so we would have spent the entire cruise with the clothes on our back! 

    Flying from Kythera to Athens most checked in luggage, for reasons unknown, did not make it on the plane. Passengers waited hours at the conveyor belt for their luggage only to find out they had not left the island!

    With only one flight per day, luggage would not be received until the arrival of the flight the next day. In our case, we were going straight on a cruise ship the next morning. Any luggage would not have been returned until we got back to Athens after the cruise!

    After finding out about that incident, our teenage daughter was convinced – Carry On Only was a brilliant idea!

    Top 3 Essentials for Carry On Only

    1. Packing Method

    To follow the Carry On Only policy one needs to implement the 5-4-3-2-1 packing method. I originally read about this on a home and lifestyle website.


    The 5-4-3-2-1 packing method involves variations around – 

    • 5 tops
    • 4 bottoms
    • 3 dresses/jumpsuits and 3 shoes
    • 2 swimming togs and 2 bags
    • 1 accessory (hat, scarf, sunglasses)

    This packing method has been invaluable and by keeping to matching combinations it is not difficult. For the most part we looked fairly decent. The uber cool waitstaff at the Dolce and Gabbana Martini restaurant in Milan would probably say otherwise!

    Our outfits in holiday snaps are same/samey but hey, are you a tourist or in a fashion show! (Actually in Milan it was probably the latter!)

    There can be lots of variations to the 5-4-3-2-1 method. Our daughter had about 15 tops but teenage girls tops and indeed all their clothing items seem to be minimal. They didn’t take up much extra space! 

    As a base template this method will massively cut down on your packing. Of course using packing cubes are also a must.

    I have also tried this for winter destinations, swapping out dresses and swimsuits for jackets and thermals. It is much harder to squeeze ski gear in carry on but usually I will wear or hold bulkier items. We also followed this method when we went on safari although all items were khaki in colour!

    5-4-3-2-1 packing
    Deciding what to include for the kids in the 5-4-3-2-1 packing method!


    2. Transfer Liquids

    The biggest effort with Carry On Only is what to do about liquids. I suggest ordering a range of 50ml and 100ml travel bottles to transfer moisturisers, cleansers and hair products. Note – stricter airports only allow a 1 litre in one see-through bag.  If you are happy to use any products then you can always buy supplies when you arrive at your destination. 

    Liquids for Carry On

     Transfer all liquids into 100ml containers

    3. Get on board early – carry on needs overhead space

    Another challenge when travelling with Carry On Only is finding enough overhead locker space. Nowadays people seem to bring all sorts of items of varying shapes and sizes and it fills up super quick.

    It is not unusual to have your cabin bag in an overhead locker nowhere near your seat. This makes it easier for opportunistic thieves to take something from yours while pretending to open theirs! To avoid this, queue up at the gate early so you can “bags” the lockers above your seat. Don’t worry if you look like a keen bean! 

    I highly recommend you give Carry On Only a try. It is such a win to walk off the plane, go through immigration and then straight out the door. A wonderful head start to your holiday!

    Thanks for reading and I do hope you give it a try!

    Shareen

    Carry On luggage

    All packed and ready to go! Carry On Only for 3 weeks in Europe for a family of 5!

error: Content is protected !!